
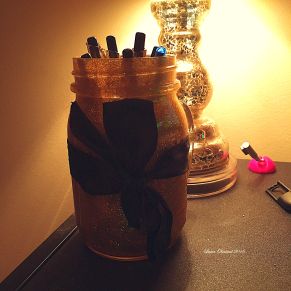
For the past couple of days I have been working on a DIY project. Its nothing special, but I love the end results. I have taken the burned out candles from Bath and Body Works or Yankee Candle and turned them into crafty, diy, glittery staples for around the house. A year or two ago, I turned a simple mason jar into glittery, southern desk accessory.
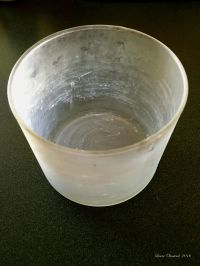
This one turned out to be a really easy project, however, it did not have any wax in it like the candles do. Here are a few easy steps to clean out the jars.
1. Freeze the candle for a couple of hours.
Normally, you will read that the candle should be placed in the freezer for about thirty minutes. I have found for the large candles that they need MUCH longer than do the smaller ones.
2. Once the candle is frozen, take a duller knife (or something similar) and break the remaining wax into pieces.
Like I said, just break the wax away from the glass. Please take precaution with the knife or sharp object as you complete this task. Try to get as much of the was out as possible. In the larger candles you may notice that the wicks and their anchors are glued down to the bottom of the glass. If this is the case, I would suggest putting the the glass on top of a coffee pot warming plate or a hot plate of some sort. This way it melts the glue down to where you can wipe it off the bottom or scrape it off. You must be careful as the glass will be HOT! I would suggest using a potholder to hold the glass, maybe one with a rubber gripping hand.
3. Wash and dry the glass.
Now that you have the glass cleaned out, it is time to DECORATE! Yay!! This is the best and most fun part of the entire project.
4. Apply Mod Podge.

Within the glass, I just poured a little bit in and brushed up against the sides, that way it came out to a more even glaze. Just remember not to use too much because then you will have to wait longer for it to dry!!
5. Apply decoration.


For my candle glass, I chose to use fine gold glitter, however, you can use any kind of material you want! Make sure the entire inside is coated with whatever material you want to use otherwise you could see through the glass, especially in the light (unless the design is meant to have open spaces).
6. Reapply.


If necessary, I have found that it is crucial that you apply your material for a second time. In my case, it needed another coat of glitter so the light didn’t shine through the glass so transparently. For my mason jar, I did not have this problem, but if you plan to put a tea candle or store it near a light, I would suggest applying two coats of glitter since you will see the streak marks where the glue and glitter were applied.
7. Share!
I would love to see your creative side so don’t hesitate to share your decor!
Give me suggestions of types of material and I can see how they turn out and post more on here! I hope you enjoyed this DIY post! I honestly enjoy decorating these because then I look forward to decorating my house in my own unique way. Feel free to comment on future designs you may be interested in! I would love to hear your feedback!
»![]() «
«

Fun! 🙂
LikeLike